一、Mybatis概念 1>MyBatis 是支持定制化 SQL(需要自己写sql语句)、存储过程以及高级映射的优秀的持久层框架
2>MyBatis 避免了几乎所有的 JDBC 代码和手动设置参数以及获取结果集
3>MyBatis可以使用简单的XML或注解用于配置和原始映射,将接口和Java的POJO(Plain Old Java Objects,普通的Java对象)映射成数据库中的记录
4>MyBatis 是一个半自动的ORM(Object Relation Mapping)框架
二、搭建mybatis 创建maven工程 1 <packaging>jar</packaging>
1 2 3 4 5 6 7 8 9 10 11 12 13 14 15 16 17 18 19 20 21 <dependencies>3.5 .9 </version>4.12 </version>8.0 .27 </version>
创建MyBatis核心配置文件 习惯上命名为mybatis-config.xml,存放的位置是src/main/resources目录下
1
2
3
4
5
6
7
8
9
10
11
12
13
14
15
16
17
18
19
20
21
22
<?xml version="1.0" encoding="UTF-8" ?> <!DOCTYPE configuration PUBLIC "-//mybatis.org//DTD Config 3.0//EN" "http://mybatis.org/dtd/mybatis-3-config.dtd" > <configuration > <environments default ="development" > <environment id ="development" > <transactionManager type ="JDBC" /> <dataSource type ="POOLED" > <property name ="driver" value ="com.mysql.cj.jdbc.Driver" /> <property name ="url" value ="jdbc:mysql://localhost:3306/test" /> <property name ="username" value ="root" /> <property name ="password" value ="123456" /> </dataSource > </environment > </environments > <mappers > <mapper resource ="mappers/UserMapper.xml" /> </mappers > </configuration >
创建Mapper接口 MyBatis中的mapper接口相当于以前的dao。区别在于mapper仅仅是接口,我们不需要提供实现类
命名规则:表所对应的实体类的类名+Mapper.xml
1
2
3
4
public interface UserMapper {int insertUser () ;
创建MyBatis映射文件
相关概念:ORM(Object Relationship Mapping)对象关系映射。
对象:Java的实体类对象
关系:关系型数据库
映射:二者之间的对应关系
映射文件的命名规则:表所对应的实体类的类名+Mapper.xml,存放的位置是src/main/resources/mappers目录下
这个例子的名字就是UserMapper.xml
1
2
3
4
5
6
7
8
9
10
11
12
13
14
15
16
<?xml version="1.0" encoding="UTF-8" ?> <!DOCTYPE mapper PUBLIC "-//mybatis.org//DTD Mapper 3.0//EN" "http://mybatis.org/dtd/mybatis-3-mapper.dtd" > <mapper namespace ="mybatis.vickkkyz.mapper.UserMapper" > <insert id ="insertUser" > </insert > <select id ="selectID" resultType ="mybatis.vickkkyz.pojo.User" > </select > </mapper >
< mapper namespace="mybatis.vickkkyz.mapper.UserMapper" >namespace的路径规则是对应Mapper接口的全类名
例如:表t_user,映射的实体类为User,所对应的映射文件为UserMapper.xml
因此一个映射文件对应一个实体类,对应一张表的操作
MyBatis映射文件用于编写SQL,访问以及操作表中的数据
通过junit测试功能 1 2 3 4 5 6 7 8 9 10 11 12 public class MybatisTest {@Test public void test01 () throws IOException {InputStream is = Resources.getResourceAsStream("mybatis-config.xml" );SqlSessionFactoryBuilder sqlSessionFactoryBuilder = new SqlSessionFactoryBuilder ();SqlSessionFactory sqlSessionFactory = sqlSessionFactoryBuilder.build(is);SqlSession sqlSession = sqlSessionFactory.openSession(true );UserMapper userMapper = sqlSession.getMapper(UserMapper.class);int result = userMapper.insertUser();"result:" + result);
加入log4j日志功能 1 2 3 4 5 6 <dependency > <groupId > log4j</groupId > <artifactId > log4j</artifactId > <version > 1.2.17</version > </dependency >
log4j的配置文件名为log4j.xml,存放的位置是src/main/resources目录下
1 2 3 4 5 6 7 8 9 10 11 12 13 14 15 16 17 18 19 20 <?xml version="1.0" encoding="UTF-8" ?> <!DOCTYPE log4j :configuration SYSTEM "log4j.dtd" > <log4j:configuration xmlns:log4j ="http://jakarta.apache.org/log4j/" > <appender name ="STDOUT" class ="org.apache.log4j.ConsoleAppender" > <param name ="Encoding" value ="UTF-8" /> <layout class ="org.apache.log4j.PatternLayout" > <param name ="ConversionPattern" value ="%-5p %d{MM-dd HH:mm:ss,SSS} %m (%F:%L) \n" /> </layout > </appender > <logger name ="java.sql" > <level value ="debug" /> </logger > <logger name ="org.apache.ibatis" > <level value ="info" /> </logger > <root > <level value ="debug" /> <appender-ref ref ="STDOUT" /> </root > </log4j:configuration >
三、核心配置文件详解
核心配置文件中的标签必须按照固定的顺序(有的标签可以不写,但顺序一定不能乱):顺序为: properties、settings、typeAliases、typeHandlers、objectFactory、objectWrapperFactory、reflectorFactory、plugins、environments、databaseIdProvider、mappers
properties 1 2 <properties resource ="jdbc.properties" > </properties >
jdbc.properties文件如何创建?
new -> Resource Bundle 创建出来的文件后缀默认就是properties。
1 2 3 4 jdbc.driver =com.mysql.jdbc.Driver jdbc.url =jdbc:mysql://localhost:3306/Mybatis jdbc.username =root jdbc.password =root
Settings 1 2 3 4 5 6 <settings > <setting name ="mapUnderscoreToCamelCase" value ="true" /> <setting name ="lazyLoadingEnabled" value ="true" /> </settings >
typeAliases 1 2 3 4 5 6 7 8 <typeAliases > <typeAlias type ="com.jianjian.pojo.User" > </typeAlias > <typeAlias type ="com.jianjian.pojo.User" alias ="user" > </typeAlias > <package name ="com.jianjian.pojo" /> </typeAliases >
plugins 1 2 3 4 5 <plugins > <plugin interceptor ="org.mybatis.example.ExamplePlugin" > <property name ="someProperty" value ="100" /> </plugin > </plugins >
mappers 1 2 3 4 5 6 7 8 9 <mappers > <mapper resource ="UserMapper.xml" /> </mappers > <mappers > <package name ="com.jianjian.mapper" /> </mappers >
引入包下所有映射文件:
条件1:此方式必须保证mapper接口和mapper映射文件必须在相同的包名下
条件2:mapper接口要和mapper映射文件的名字一致
在recources目录下创建包的方法:new -> Directory -> com/atguigu/mybatis/xml这样的话就是一层一层的目录
plugins 1 2 3 4 5 6 <plugins > <plugin interceptor ="org.mybatis.example.ExamplePlugin" > <property name ="someProperty" value ="100" /> </plugin > </plugins >
四、Mybatis获取参数的两种方式${}和#{}
${}的本质就是字符串拼接
${}使用字符串拼接的方式拼接sql,若为字符串类型或日期类型的字段进行赋值时,需要手动添加单引号
#{}的本质就是占位符赋值
#{}使用占位符赋值的方式拼接sql,若为字符串类型或日期类型的字段进行赋值时,可以自动添加单引号 ,不需要自己添加
单个字面量类型的参数 1 2 3 4 <select id ="getUserByUsername" resultType ="User" > </select >
1 2 3 4 <select id ="getUserByUsername" resultType ="User" > </select >
多个字面量类型的参数 若mapper接口中的方法参数为多个时,此时MyBatis会自动将这些参数放在一个map集合中
以arg0,arg1…为键,以参数为值,或者以param1,param2…为键,以参数为值;
使用arg或者param都行,要注意的是,arg是从arg0开始的,param是从param1开始的
1 2 3 4 <select id ="checkLogin" resultType ="User" > </select >
1 2 3 4 <select id ="checkLogin" resultType ="User" > </select >
map集合类型的参数 若mapper接口中的方法需要的参数为多个时,此时可以手动创建map集合
map的规则是以键为字段名,以值为字段值
将这些数据放在map中只需要通过${}和#{}访问map集合的键就可以获取相对应的值,注意${}需要手动加单引号
1 2 3 4 <select id ="checkLoginByMap" resultType ="User" > </select >
1 2 3 4 5 6 7 8 9 10 @Test public void checkLoginByMap () { SqlSession sqlSession = SqlSessionUtils.getSqlSession(); UserMapper userMapper = sqlSession.getMapper(UserMapper.class); new HashMap <>(); "usermane" ,"admin" ); "password" ,"123456" ); User user = userMapper.checkLoginByMap(map);
实体类类型的参数 若mapper接口中的方法参数为实体类对象时此时可以使用${}和#{},通过访问实体类对象中的属性名 获取属性值
1 2 3 4 <insert id ="insertUser" > </insert >
1 2 3 4 5 6 7 @Test public void insertUser () { SqlSession sqlSession = SqlSessionUtils.getSqlSession(); UserMapper userMapper = sqlSession.getMapper(UserMapper.class); User user = new User (null ,"Tom" ,"123456" ,12 ,"男" ,"123@321.com" );
使用@Param标识参数 可以通过@Param注解标识mapper接口中的方法参数,此时会将这些参数放在map集合中
以@Param注解的value属性值为键,以参数为值;在xml文件中就直接使用param注解的值来取就可以得到这个参数传进来的值了
以param1,param2…为键,以参数为值;
只需要通过${}和#{}访问map集合的键就可以获取相对应的值,注意${}需要手动加单引号
1 2 3 4 <select id ="CheckLoginByParam" resultType ="User" > </select >
1 2 3 4 <select id ="CheckLoginByParam" resultType ="User" > </select >
1 2 3 4 5 6 @Test public void checkLoginByParam () { SqlSession sqlSession = SqlSessionUtils.getSqlSession(); UserMapper mapper = sqlSession.getMapper(UserMapper.class);"admin" ,"123456" );
五、特殊SQL的执行 这些SQL语句只能使用${} 而不是 #{},因为#{}会给字符串自动增加单引号,导致SQL语句不正确。
1、模糊查询 1 2 getUserByLike (@Param("username") String username) ;
1 2 3 4 5 6 <select id ="getUserByLike" resultType ="User" > </select >
2、批量删除 1 2 int deleteMore (@Param("ids") String ids) ;
1 2 3 <delete id ="deleteMore" > </delete >
如果写成#{},最终的SQL语句是delete from t_user where id in ('1,2,3'),此时1,2,3整体是一个字符串,正确的语句应该是delete from t_user where id in (1,2,3),或者delete from t_user where id in ('1','2','3')
3、动态设置表名 如果传入的参数是表名,只能用${},而不能用#{},因为表名不能加引号
1 2 getUserByTable (@Param("tableName") String tableName) ;
1 2 3 4 <!--List<User> getUserByTable (@Param("tableName") String tableName) ;--> "getUserByTable" resultType="User" >
4、添加功能获取自增的主键 在mapper.xml中设置两个属性
useGeneratedKeys:设置使用自增的主键keyProperty:将自增的主键的值赋值给传输到映射文件中参数的某个属性,因为增删改有统一的返回值是受影响的行数,因此只能将获取的自增的主键放在传输的参数user对象的某个属性中
1 2 void insertUser (User user) ;
1 2 3 4 <insert id ="insertUser" useGeneratedKeys ="true" keyProperty ="id" > </insert >
然后在测试类中获取这个user对象,它的id会被自动赋值为数据库中的自增主键的值
六、自定义映射resultMap 字段和属性的映射关系不同该如何处理 数据库字段一般采用下划线,Java属性一般采用驼峰,所以就会造成字段名和属性名不一致,导致映射不了,并不会报错,只是无法映射的字段会显示null
通过核心配置解决
1 2 3 4 <settings > <setting name ="mapUnderscoreToCamelCase" value ="true" /> </settings >
通过resultMap解决
1 2 3 4 5 6 7 8 9 10 11 <resultMap id ="empResultMap" type ="Emp" > <id property ="eid" column ="eid" > </id > <result property ="empName" column ="emp_name" > </result > <result property ="age" column ="age" > </result > <result property ="sex" column ="sex" > </result > <result property ="email" column ="email" > </result > </resultMap > <select id ="getAllEmp" resultMap ="empResultMap" > </select >
resultMap:设置自定义映射
属性:
id:表示自定义映射的唯一标识,不能重复
type:查询的数据要映射的实体类的类型
子标签:
id:设置主键的映射关系
result:设置普通字段的映射关系
子标签属性:
property:设置映射关系中实体类中的属性名
column:设置映射关系中表中的字段名
一对多映射和多对一映射详见简简的博客
七、动态SQL if 1 2 3 4 5 6 7 8 9 10 11 12 13 14 15 16 <select id ="getEmpByCondition" resultType ="Emp" > <if test ="empName != null and empName !=''" > </if > <if test ="age != null and age !=''" > </if > <if test ="sex != null and sex !=''" > </if > <if test ="email != null and email !=''" > </if > </select >
where where和if一般结合使用
若where标签中的if条件都不满足,则where标签没有任何功能,即不会添加where关键字
若where标签中的if条件满足,则where标签会自动添加where关键字,并将条件最前方多余的and/or去掉
注意:where标签不能去掉条件后多余的and/or
trim trim用于去掉或添加标签中的内容
prefix:在trim标签中的内容的前面添加某些内容
suffix:在trim标签中的内容的后面添加某些内容
prefixOverrides:在trim标签中的内容的前面去掉某些内容
suffixOverrides:在trim标签中的内容的后面去掉某些内容
若trim中的标签都不满足条件,则trim标签没有任何效果,也就是只剩下select * from t_emp
choose、when、otherwise
choose、when、otherwise 相当于 if…else if…else
when 至少要有一个,otherwise 至多只有一个
1 2 3 4 5 6 7 8 9 10 11 12 13 14 15 16 17 18 19 20 <select id ="getEmpByChoose" resultType ="Emp" > <where > <choose > <when test ="empName != null and empName != ''" > </when > <when test ="age != null and age != ''" > </when > <when test ="sex != null and sex != ''" > </when > <otherwise > </otherwise > </choose > </where > </select >
foreach 对集合进行遍历
属性:
collection:设置要循环的数组或集合
item:表示集合或数组中的每一个数据
separator:设置循环体之间的分隔符,分隔符前后默认有一个空格,如,
open:设置foreach标签中的内容的开始符
close:设置foreach标签中的内容的结束符
sql sql语句可以记录一段公共sql片段,在使用的地方通过include标签进行引入
1 <sql id ="empColumns" > eid,emp_name,age,sex,email</sql >
1 2 3 4 <select id ="getEmpByCondition" resultType ="Emp" > <include refid ="empColumns" > </include > from t_emp </select >
八、分页插件 1 2 3 4 5 <dependency > <groupId > com.github.pagehelper</groupId > <artifactId > pagehelper</artifactId > <version > 5.2.0</version > </dependency >
在MyBatis的核心配置文件(mybatis-config.xml)中配置插件
1 2 3 4 <plugins > <plugin interceptor ="com.github.pagehelper.PageInterceptor" > </plugin > </plugins >
在查询功能之前使用PageHelper.startPage(int pageNum, int pageSize)开启分页功能
pageNum:当前页的页码
pageSize:每页显示的条数
在查询获取list集合之后,使用PageInfo<T> pageInfo = new PageInfo<>(List<T> list, intnavigatePages)获取分页相关数据
八、mybatis逆向工程 ①引入依赖和插件 1 2 3 4 5 6 7 8 9 10 11 12 13 14 15 16 17 18 19 20 21 22 23 24 25 26 27 28 29 30 31 32 33 34 35 36 37 38 39 40 41 42 43 44 45 46 47 48 <dependencies > <dependency > <groupId > org.mybatis</groupId > <artifactId > mybatis</artifactId > <version > 3.5.7</version > </dependency > </dependencies > <build > <plugins > <plugin > <groupId > org.mybatis.generator</groupId > <artifactId > mybatis-generator-maven-plugin</artifactId > <version > 1.3.0</version > <dependencies > <dependency > <groupId > org.mybatis.generator</groupId > <artifactId > mybatis-generator-core</artifactId > <version > 1.3.2</version > </dependency > <dependency > <groupId > com.mchange</groupId > <artifactId > c3p0</artifactId > <version > 0.9.2</version > </dependency > <dependency > <groupId > mysql</groupId > <artifactId > mysql-connector-java</artifactId > <version > 5.1.8</version > </dependency > </dependencies > </plugin > </plugins > </build >
②创建核心配置文件 首先在src/main/resources目录下创建核心配置文件mybatis-config.xml
1 2 3 4 5 6 7 8 9 10 11 12 13 14 15 16 17 18 19 20 21 22 23 24 25 26 27 28 29 30 31 32 33 34 35 36 37 <?xml version="1.0" encoding="UTF-8" ?> <!DOCTYPE generatorConfiguration PUBLIC "-//mybatis.org//DTD MyBatis Generator Configuration 1.0//EN" "http://mybatis.org/dtd/mybatis-generator-config_1_0.dtd" > <generatorConfiguration > <context id ="DB2Tables" targetRuntime ="MyBatis3" > <jdbcConnection driverClass ="com.mysql.jdbc.Driver" connectionURL ="jdbc:mysql://192.168.198.100:3306/db_imperial_court" userId ="root" password ="atguigu" > </jdbcConnection > <javaModelGenerator targetPackage ="com.atguigu.imperial.court.entity" targetProject =".\src\main\java" > <property name ="enableSubPackages" value ="true" /> <property name ="trimStrings" value ="true" /> </javaModelGenerator > <sqlMapGenerator targetPackage ="com.atguigu.imperial.court.mapper" targetProject =".\src\main\java" > <property name ="enableSubPackages" value ="true" /> </sqlMapGenerator > <javaClientGenerator type ="XMLMAPPER" targetPackage ="com.atguigu.imperial.court.mapper" targetProject =".\src\main\java" > <property name ="enableSubPackages" value ="true" /> </javaClientGenerator > <table tableName ="t_emp" domainObjectName ="Emp" /> <table tableName ="t_memorials" domainObjectName ="Memorials" /> </context > </generatorConfiguration >
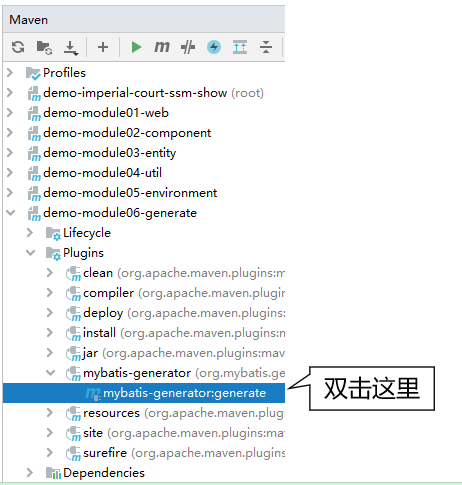
③执行逆向生成